Tag Archives: spray paint

Patio Furniture (Re)-Makeover

A few years ago I did a patio furniture makeover.  I made new chair pads and painted all of the chairs and the table.  It looked great when I did it…but with time it had faded and did  not look all that good anymore!  So I decided that it was time for a Re-makeover!  Is there such a thing???patio furniture makeover Continue reading

Potting Table Makeover

DSC_0046

I have a potting table down on my back patio and I love it!  But we had a big maple tree that died and we had to cut it out and the potting table was right in front of this tree, so we had to move it out of the way to cut the tree down.  This is what my poor table looked like when I pulled it out of the way:

DSC_0317 Continue reading

Painted Mason Jars

When I did the visiting teaching handout for this month I pictured it with a painted mason jar.  These are so easy to make and all you need is a bottle and some spray paint and of course some cute ribbon!  These are perfect for a vase for flowers from your garden or a bunch from the grocery store. I just went outside in my yard and picked these Shasta Daisies, I had the jars, ribbon and paint so this project cost me nothing out of pocket to make.  Bonus! Continue reading

Patio Furniture Re-do

I had this patio set out on my deck for years but we really did not use it very much because it was on the west side of the house and it was always too hot in the afternoon even with the umbrella up.  The fabric got so sun bleached and was starting to fall apart that I decided that it was time to do something different with it. Continue reading

Fun Easter Pots!

I am way excited about my new Easter printable!  I was originally going to just tie it together with some cute ribbon and make it into a bunting for my fireplace, which would be really cute, but  I decided to use each individual letter and put them in painted pots and look at what I came up with!

Continue reading

Framed Ornaments

My daughter and I did another craft together!  I think that is a record for us to do two projects in about 1 weeks time!

My daughter found the idea on Pinterest.  If you have never looked at Pinterest, you need to go there.  Just click here and you can follow me!

This is a cute, fun, easy craft that you can complete in couple of hours!

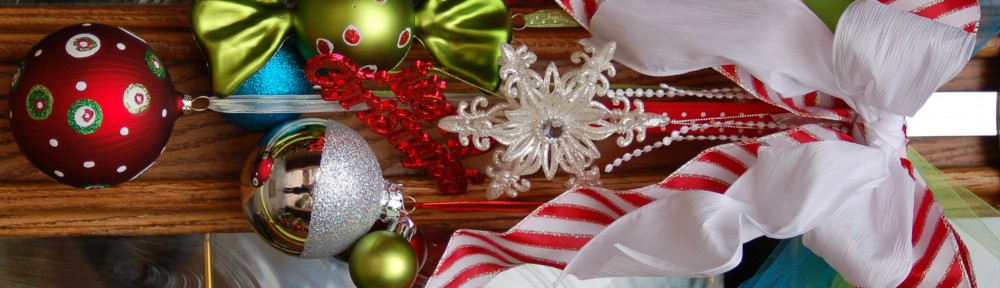
It is framed Christmas ornaments!

First of all, you need to start with a frame.  This is one that I picked up at the DI and I took the picture and glass out and spray painted it lime green. (This frame was a little bit bigger than I would have liked, but it was the only one they had that would work!  The thicker the frame, the better!)

I used this Rust-oleum ultra cover, 2x paint.  I love this stuff!  It really covers well and I only have to do a couple of coats!  This color is Key Lime Green!

After painting the frame gather all your supplies together.  We hung each of the ornaments on a ribbon at varying lengths.  We then just used a staple gun and stapled the ribbons to the back of the frame.This is the bow that my daughter was experimenting with, but then changed the silver flower to a big candy cane striped ribbon.  I told her that I needed a picture of the frame and this is what I got!  Just a goof off!  (do you love the plastic bags hanging on the stair railing?  This is the catch-all area of my house!)

We added a big bow, tulle, curly cues, and beads to the front of the frame.I think that it looks quite festive and I am starting to get the Christmas Spirit!  I have most of my decorating done, and it is a good thing, because this week a lot of the parties will start at our house!What are some of your favorite Christmas decorations?  Have you had them for a long time and are they priceless, or are you getting/making a lot of new, updated things?  I have a couple more projects that I am working on and hopefully I will be able to get them done this week, before the parties!  I will share when they get finished.

Girl’s Night Out

We had a fun girl’s night out last week.  My husband was gone, so when the cat’s away the mice will play, and play we did!  We hired a baby sitter for all the kids and they had a great time playing downstairs while we were upstairs.  We let them come up for the food after we were all done.  (Nice, I know!)  What a fun group!   And most of  the time the cousins are all great friends.

We made these pillow and I totally copied the idea from a pinterest blog.  I even made the pillows in the back like on their display. She has done a great tutorial on how to make them here so I am not going to do another one.  I will tell you what we did different, as you can see, some of them did the “or” in black paint and just used fine glitter which worked ok, but the glitter had to be sprayed with varnish to help keep the glitter from coming off.  She suggests that you go to Walmart and buy the painter canvas, which I did, but it is not a very high quality and it frays really bad, even after using pinking shears.  So I would suggest that you buy a regular piece of canvas from a fabric store.  The next thing we did different was that we found out the glitter paint did not go very far, so we painted the orange with regular spray paint and then added a glitter finish to the top.  It worked great that way!  But all in all it was fun to see how everyone’s turned out and we had a fun evening together without kids (kind of!) Here’s what mine look like!I don’t know if I can leave them outside or not, I will have to spray scotch gaurd on them if I do so the weather won’t ruin them.!I think they turned out pretty darn cute.

Imelda Marcos’ Worst Nightmare!

One of my husband’s nickname for me is “Imelda” and my reply to that is, “I wish!” But I am sure that this post would be her worst nightmare…

A SHOE MAKE-OVER!

My niece told me about a shoe makeover that she had done and so I decided to try it out.  I had this cute pair of shoes but I had only worn them a couple of times because of the color.  They are not pink and they are not lavendar, they are somewhere in between, and while the color is ok, I just did not have anything to wear them with, thus, the makeover!

First, you have to tape all around the sole and the inside of the shoes.  This part took the longest by far.  I had a hard time getting the painters tape to stick to the rubber sole.  I had to just use little pieces to make them contour around the toe and the heel.  You will also want to tape the inside so your foot is not touching the spray paint.  I covered the buckle because I wanted it to remain the same color.I used this ultra cover paint because it really does cover better than the regular spray paint. (And the fact that I already had the paint, so this make-over cost me nothing but my time!  My husband also really likes that.)I gave them three light coats with quick, short sprays.Remove all the tape and enjoy a new pair of shoes!

This next picture reminds me of the book series “No.1 Ladies Detective Agency” where Mma Mukutsi says that her shoes talk to her and they compliment her or give her advice.  If these shoes could talk I think that they would say “we look great, thanks Mma Mukutsi!”So what do you think!  They match this sweater perfectly and I have a whole new looks with these shoes!

These shoes are fun, but I am afraid that the paint is going to scratch easily, so I will not wear them for every day. (but I can always touch them up with another quick spray of paint if I need too!)