Tag Archives: ribbon

Blanket Delivery

Yesterday I did a tutorial on how to make the fringed fleece blankets and I was able to get eight of these made and ready for delivery to a local hospital.  We are doing this project because one of my granddaughters was recently in the hospital and she received a blanket like this and it made her so happy that I decided to pay it forward to some other sick children.

On Sunday afternoon after we had dinner, I talked all of the girls into helping me tie up the blankets to get them ready for delivery to the hospital.  As you know, my motto is that ribbon makes everything cuter!  So we tied up the blankets with different colored ribbons.  We have 4 boy blankets and 4 girl blankets ready to go! Continue reading

Headband Tutu’s

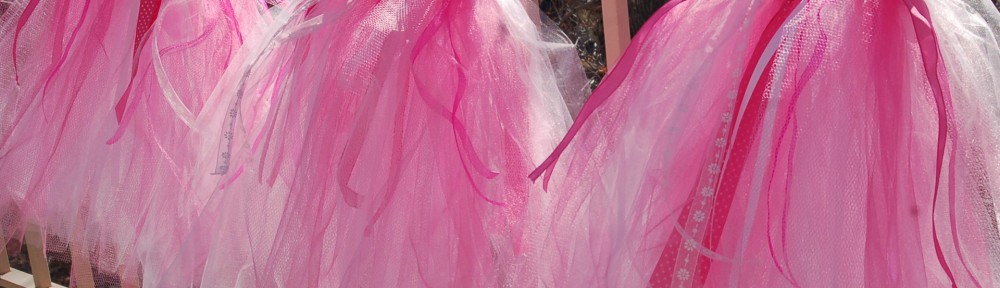
I saw these made up at a boutique last fall, and thought what a cute idea it would be for my three granddaughters!  They love to dress up and pretend that they are princesses, so I thought they might love to play in these little tutu’s.

They were really fun to make and you could do any color combination that you would like. There is also no sewing involved!  So, who wants to make a tutu?

First, you will need one of these stretchy elastic headbands or you can just buy the elastic and make it into a headband.  I found white and pink ones.

Then you need whatever color tulle you like.  I chose white, light pink, and dark pink.  I just used the tulle that comes on a bolt and all I had to do is cut the lengths that I needed.   My granddaughters are still fairly small, so I used a 36 inch length and when they are tied they are about 17 inches long.  The skirts are also are pretty full, so they are not quite that long when they are wearing them.   You can make them as long or as short as you would like.  Fold the length of tulle in half and put the loop through one of the holes like this:

Then put the ends, through the loop:and pull tight like so.

I skipped every other hole and tied a different color in it,

repeating until I had gone all the way around.

Then do one more row of tulle.  I went directly above the first row and tied the same color as I had on the bottom row.  You can mix it up if you wanted to, but I like the look of the colors being a little bit more grouped.

Then I went in between the rows of tulle and tied different lengths and colors of ribbon the same way as I had tied the tulle.  Tie the ribbons all the way around mixing the different ribbons as you go.  You could add flowers or beads or buttons on the ribbons at this point but I felt like these were great just the way they were.

So cute and no sewing!

We are going to have a Princess Tea Party this week, so I will show you what they look like on the little girls after we have our party.


Framed Ornaments

My daughter and I did another craft together!  I think that is a record for us to do two projects in about 1 weeks time!

My daughter found the idea on Pinterest.  If you have never looked at Pinterest, you need to go there.  Just click here and you can follow me!

This is a cute, fun, easy craft that you can complete in couple of hours!

It is framed Christmas ornaments!

First of all, you need to start with a frame.  This is one that I picked up at the DI and I took the picture and glass out and spray painted it lime green. (This frame was a little bit bigger than I would have liked, but it was the only one they had that would work!  The thicker the frame, the better!)

I used this Rust-oleum ultra cover, 2x paint.  I love this stuff!  It really covers well and I only have to do a couple of coats!  This color is Key Lime Green!

After painting the frame gather all your supplies together.  We hung each of the ornaments on a ribbon at varying lengths.  We then just used a staple gun and stapled the ribbons to the back of the frame.This is the bow that my daughter was experimenting with, but then changed the silver flower to a big candy cane striped ribbon.  I told her that I needed a picture of the frame and this is what I got!  Just a goof off!  (do you love the plastic bags hanging on the stair railing?  This is the catch-all area of my house!)

We added a big bow, tulle, curly cues, and beads to the front of the frame.I think that it looks quite festive and I am starting to get the Christmas Spirit!  I have most of my decorating done, and it is a good thing, because this week a lot of the parties will start at our house!What are some of your favorite Christmas decorations?  Have you had them for a long time and are they priceless, or are you getting/making a lot of new, updated things?  I have a couple more projects that I am working on and hopefully I will be able to get them done this week, before the parties!  I will share when they get finished.

Thanksgiving Table Centerpiece

I had to make some centerpieces for a small dinner last weekend and this is what I came up with.  I thought that they looked festive without too much work!

I found this black fabric with gold glitter in the design, so I thought that I could just use the gourds and pumpkins leftover from Halloween. I used the gold Krylon Glitter Blast spray paint to paint them and then just simply tied ribbons and tulle on them.  For the jars, I filled them up with black beans and put a battery votive candle down in the beans.  Then I tied the jars with a pretty metallic gold ribbon…

And  I think that they turned out pretty cute with out a lot of time or money!  You could also put popcorn kernels, candy, rice, or just about anything in the jars to make your candles.  I think I will have to use this idea again for Christmas, with red and green candies in the jar!

 Do you have any fun, easy ways to decorate your tables?  I would love to hear from you!

November Visiting Teaching Conference Bookmark

This month for visiting teaching you will pick a talk from the conference Ensign, so for the handout, I decided to do a bookmark.

You can use it two ways.  It has a paper clip at the top so you can clip it to the page you want to save, or if you are cross referencing or studying two different talks, you can take the paper clip off and use it on another page, like this…

I cut a slit in the top of the bookmark to insert the paper clip.  Tie a couple of ribbons on the paper clip to make it a little cuter :) I think that ribbon makes everything cuter!  Some day I will show you my ribbon stash!

I had Alphagraphics print my bookmarks on a heavy, glossy cardstock and it cost me 69 cents!  I have put 4 book marks on one 81/2 x 11 sheet, so there should be enough for you to have one too!

To print, just right click and go to copy, then open your favorite program, like Word, then right click again and go to paste.  Or you can send it to your favorite copy center like I did.

 Here is the free printable for you to use:

Happy Thanksgiving to you!

We hope your family like ours, continues to have more to be thankful for each year!


Remember This?

Do you remember when I asked if anyone knew what I was going to use this for?  One of my readers actually had a great suggestion, she said that she would use it to hang a quilt on!  I think that was a super idea and I may just have to try to get another one!

But what I had in mind when I bought this hanger, was to put wooden blocks on it to spell out a word.  My friend, Sue, that went with me to the Hobble Creek Boutique, bought one too and she and her husband cut out these blocks for me!  They have a hole drilled through the top so we can hang them.First, I did a wash around the edges with Raw Umber paint and a lot of water.Then I painted these three colors on the front side of the blocks, after they were dry, I sanded the edges and did a wash with the raw umber/water mix to add the distressed look.These are the products that I used.  I used Ceramcoat paint: Light Foliage Green and Tompte Red.  I also used Americana paint in Burnt Orange and Raw Umber.  I used Mod Podge as a varnish and a sealer for the wood.  It also helps the vinyl stick a little better.  You may be wondering what I painted with the red…well, I painted the backside of the blocks with the red and the green..I added some vinyl letters, some fall leaves and a little ribbon and whaalah!Then on the back where I had painted the red and green, I added the letters for NOEL and used some red rhinestones for the berries on the holly.  Now I have two different holiday decorations for the price of one! You can’t beat that!  Of course for Christmas, I will add a new ribbon.I love this, now I can use the fall hanging through Thanksgiving and I just have to turn the blocks around, add a new ribbon, and it is ready for Christmas!

Have you started thinking of Thanksgiving and Christmas already?  Sometimes I think we get ahead of ourselves.  When my children were little, I used to have most of my Christmas shopping done in October!  But boy, not anymore!  I am usually making, baking,wrapping and buying until the last minute!

So for now let’s just enjoy:

Happy Halloween Hauntings!