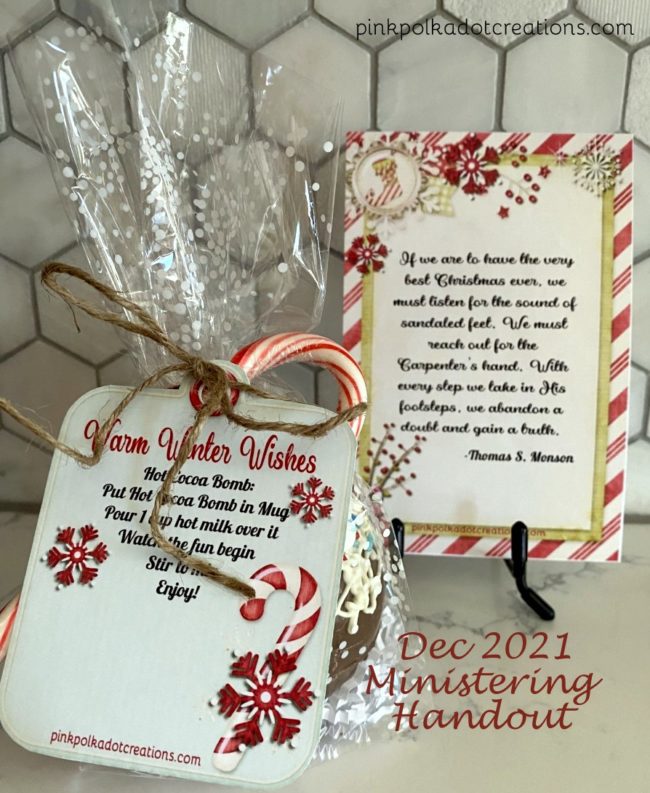
A Nifty Little Soap Trick

Today’s post goes along with the knitted dishcloths and everyone is going to have the cleanest kitchens in town!

One of my DIL’s showed me this great new product.  It is foaming dish soap!  I love it for when you want to just wash a dish or two or wipe up the counters. It works like a charm and since it is foaming you do not get a gooey slimy mess all over!

Then she told me that it is refillable too!  Bonus!  But what is even better is that she told me about this nifty little soap trick!  You do not have to use the refillable soap for this you can make your own!

You have to have a foaming pump bottle to do this, but once you have purchased one you can refill it over and over!   Just fill your bottle about 1/4 of the way or less, with any dish soap. Go easy, though, if you get too much “regular” soap the end result is slimy. Slowly add water to about 2/3 of the way to the top. You need to leave a little breathing room. It helps to tilt the bottle and pour the water in at an angle, hitting the side of the bottle first so it doesn’t go directly into the soap and create premature bubbles. Put the lid back on, shake it all up, and you are good to go! A brand new bottle of foaming dish soap, for pennies.

My friend gave me this cute foaming hand soap dispenser for Christmas and I am so excited because I can do the very same thing with my hand soap!Just use your regular refill soap and make it into foaming soap!  I think that this big refill bottle will now last me through the millennium! :)Do any of you have any great household tips?  I would love for you to share them with me!

If any of you would like to view my DIL’s blog to see about this go here.

Pin It

Chocolate Raspberry Cups

Woot, Woot! My rss reader has had a post teaser on it that I could not seem to get removed, but it is now off!  Yeah!  I think that I might have actually jumped up and down and shouted for joy!

So let’s celebrate with a little chocolate!

I saw these in an ad that came in the mail and I decided to give it a try and see if I could make some on my own. I liked the results and my family loved these!

They are beautiful to look at and oh so yummy and wouldn’t these be a fun little Valentine gift for that special little someone? Continue reading

Pin It

Chocolate Oreo Cookie Flowers!

I promised you yesterday that I would show you how to make the Chocolate Oreo Cookie Flowers.  They are so fun and easy and there are just a couple of tips to help you so the cookie part does not break quite so much.

So who is ready to make Chocolate covered Oreo Cookie Flowers?

Continue reading

Pin It

Ruffled Quilt

My daughter made this darling quilt for her daughter and had it all quilted up cute.  All that need to be done was to put the binding on and it would be finished. Easy, right?  Well not to her.  She struggled to get it finished and finally just brought it to me to complete it.  Isn’t that what moms are for?  I really didn’t mind, because I just worked on it one evening while we were watching a ball game.  She designed this pattern from a couple of other quilts that she had seen, and of course I loved all the ruffles!(I cannot believe that we are taking pictures outside in the middle of January in Utah and there is no snow!)

She started with 8 1/2 ” squares of fabric.  Then she cut 2″ x width of fabric strips for the ruffles. She then cut the strips in half so they were about 21-22″ long.  Gather each of the strips and sew them onto half of the squares.  She randomly placed 5 minky flowers on 5 of the blocks with no ruffles.  She stitched 1/4″ from edges of flowers and also from the edges of the centers of the flowers.  She then laid it out on the floor and placed every other block with ruffles and each row had the ruffles turning the opposite way.  Then simply sew the blocks together and then sew the strips together.  I think that her design turned out absolutely darling.  She put a minky backing on it so it is such a cozy quilt for her little girl.  The edges of all the ruffles and the flower centers are raw, so that when you wash it, it will rag out and be so soft and cuddly!

I think that I might need to get another quilt project going after seeing how darling this one turned out!  I loved the fact that she designed this all by herself, it tends to make a mother right proud!  :)

Pin It

Recipe Book Dividers

It is January and I am still trying to do a little bit of organizing, I had this BIG stack of recipes that I had printed from different websites, pages that I had ripped out of magazines and some recipes that were handwritten by myself or given to me by a friend.  So I decided that I really needed to get them all organized, since they are recipes that I use and I was getting tired of flipping through the whole entire stack to find one recipe!  As I was looking through these recipes I noticed that some of them had been printed 3 years ago!  So I would say that it was definitely time to get my act together.  :)

I went to Costco and bought this plain white binder that you can put a page in the front of it and also in the spine.  This is the 2″ size.Then I went to an office supply store to get these sheet protector dividers.  If you put all of your recipes in sheet protectors like I did then you will need these sheet protector dividers or you will not be able to see the tabs.I then designed these dividers that I put in the sheet protector divider pages with the tabs.  I used the “My Recipes” for the cover of my book and I created a spine title for the 2″ size binder.  There are tabs for each of the different titles and I also created some blank ones if you want to write in a category other than what I have included. These are the different categories pages that I made for my book.

If you would like to organize your recipes, here are the page dividers for you to print.  To print, right click and go to copy then open your favorite program like Word or Presentations, right click again and go to paste.  These are in 8 1/2″ x 11″ format to fit in the  standard size sheet protectors.

There are quite a few categories here so just pick the ones that you need and print them out for your own personalized book.

Here are the tabs and the spine title.  Just print, cut out and fold tabs in half and insert.I hope that you can use these and that you can get all of your recipes organized.  It really is a great feeling!

Pin It

Headband Tutu’s

I saw these made up at a boutique last fall, and thought what a cute idea it would be for my three granddaughters!  They love to dress up and pretend that they are princesses, so I thought they might love to play in these little tutu’s.

They were really fun to make and you could do any color combination that you would like. There is also no sewing involved!  So, who wants to make a tutu?

First, you will need one of these stretchy elastic headbands or you can just buy the elastic and make it into a headband.  I found white and pink ones.

Then you need whatever color tulle you like.  I chose white, light pink, and dark pink.  I just used the tulle that comes on a bolt and all I had to do is cut the lengths that I needed.   My granddaughters are still fairly small, so I used a 36 inch length and when they are tied they are about 17 inches long.  The skirts are also are pretty full, so they are not quite that long when they are wearing them.   You can make them as long or as short as you would like.  Fold the length of tulle in half and put the loop through one of the holes like this:

Then put the ends, through the loop:and pull tight like so.

I skipped every other hole and tied a different color in it,

repeating until I had gone all the way around.

Then do one more row of tulle.  I went directly above the first row and tied the same color as I had on the bottom row.  You can mix it up if you wanted to, but I like the look of the colors being a little bit more grouped.

Then I went in between the rows of tulle and tied different lengths and colors of ribbon the same way as I had tied the tulle.  Tie the ribbons all the way around mixing the different ribbons as you go.  You could add flowers or beads or buttons on the ribbons at this point but I felt like these were great just the way they were.

So cute and no sewing!

We are going to have a Princess Tea Party this week, so I will show you what they look like on the little girls after we have our party.


Roasted Red Rosemary Potatoes

I made these potatoes for dinner on Sunday when I had all my crew here.  My grandkids kept saying that they were big french fries!  And I say, whatever it takes to get them to eat  is OK by me!

These are very simple to make and they have so much good flavor to them,  I paired them up with whole roasted chicken, cabbage salad and my DIL’s yummy crescent rolls!  So does anyone want to make Roasted Red Rosemary Potatoes?

I covered my baking sheet with tin foil before I started, only because I am lazy and don’t like a lot of clean up.  You do not have to do this step unless you are lazy like me!

Next I went to my rosemary plant in my kitchen and cut a few sprigs off the top.  Don’t you love my little statue!  It says “She Who Has A Great Attitude!”  It is my reminder everyday to look for the good things and to be happy and have a Great Attitude.  It does not always work, but I find myself smiling at it a lot and it is a fun little reminder!

I used 4 sprigs, but you can totally use as much or as little as you want.

Strip all the leaves off the stem.  These stems were pretty tender and not woody at all, but I still stripped them off and then chopped them up.  You can buy fresh rosemary at most groceries stores, or you could use dried.  (If you use dried, you will want to use less than if you use fresh)Wash and chunk your potatoes and put into a big ziplock bag.  Then drizzle the potatoes with olive oil.  If you are trying to watch your weigh you can just use a little drizzle, if you want a little more flavor and crunch, add a little more oil. :)

Next, spread them out on your prepared baking sheet.

Sprinkle with the rosemary, Kosher salt, pepper, and garlic, to taste.

Bake at 375 degrees for 1 hour.  Most recipes say to bake for about 40 mins, but I like my potatoes mushy in the middle and more crispy on the outside, so I baked them for a little more than an hour and they were perfect!

I made that big pan full for my crew and I thought that I was going to have way too much, and this is what I had left over!  (I forgot to take a picture right before we ate, so I was glad that there were at least this many left over!)

This is a great way to make potatoes that can go with a lot of different dishes and they are yummy with all the different spices on them.  You could also add whatever spices your family likes…seasoning salt, parsley, dill, crushed red pepper etc.

So go make some for your dinner tonight, your taste buds with thank you!

Ruffled Scarf

My sister gave me this darling ruffled scarf for Christmas and I love it, with the flower pin and all!  Our winter this year in Utah has been extremely mild and I find myself just grabbing a scarf when I go out the door instead of a jacket, so I have loved wearing this one with all the ruffles! I think it makes me look oh so pretty. :)

My sister made this scarf and so of course I wanted to make some more, because I love how cute the ruffles are and how easy it is to make!

So do you want to make one too?

First you will need 1/4 yard of the ruffle fabric like this:

I bought 1/2 yard, so that I could make two scarfs, so I had to cut the fabric in half.  Just cut right along the line in between one of the rows of ruffles so that it is 1/4 yard wide. (9 inches)  If you want a little bit fuller scarf you could also use 1/3 yard. (12 inches)

Fold fabric in half  with right sides together along the long side and sew a 1/4″ seam.  You do not have to pin the ruffles down because you are sewing along side of the ruffle. Just make sure you tuck them in, so you don’t catch them in the seam.
Then simple turn your tube inside out!  

You are done, there are no hems because the fabric does not fray and already has a finish on it. Wasn’t that Easy Peasy!

I tied knots in the end and look at how it finishes off the look of my jacket!

I love these scarves and think that perhaps I might need one or two other colors.  We got the fabric for these scarves at Hobby Lobby.  They have a few solid colors, but if you want a striped fabric like I used on my ruffled skirt, you will have to go to a fabric or quilt shop.

So are you now ready to go make a scarf or two?  I think that this pink one is perfect for Valentines Day, or perhaps a red one would look great!  Or I could put a red and white one together!  Oh what possibilities!

No Mess Frosting Idea

I made these snowman cupcakes yesterday with a cute way to package them. But today I am going to show you how I made them…

I found this cupcake mix at the grocery store and I decided that I wanted to try them.  I made the cupcakes according to the directions, except I added applesauce instead of the oil. (a weight watchers tip that I use all of the time!)  These cupcakes have a filling in the middle like a “Twinkie” and they are really pretty good, and they come in chocolate also!  This box makes 12 cupcakes, which was perfect for what I wanted.

After the cupcakes cooled I frosted them using this super duper idea I found on pinterest! You really need to take a look at this, because it is AMAZING!  The Mind-Blowing Cake Decorating Tip: how to have mess-free icing bags!  If you hate decorating with icing because of all the mess and clean up then this idea will totally change your way of thinking!

Mind-Blowing Cake Decorating Tip

After I frosted the cupcakes I used orange slices for the nose, (Cut in half) and chocolate chips for the mouth and eyes.  I was going to dip the cupcakes in edible white glitter before putting the faces on, but I totally spaced it.  But they are really cute with the glitter!

Here is my little family of snow people!

Look at how yummy these cupcakes are with the filling in the middle!

Then I put them in a clear 9 oz plastic cup and into a cellophane bag and tied them up.  They are fun for a  little gift to give to your friends, teachers, neighbors, or perhaps even for yourself!  You need a treat every now and again, right?


Setting Goals Backwards Journal

I have been in a bit of a funk lately and I just could not seem to shake it.  I just kind of felt like I was spinning my wheels and not going anywhere.  I don’t know if it is just this time of year, with Christmas over and the start of a brand new year and thinking of all the expectations that come with that.

I tend to set a lot of resolutions every year and then they seem to fall by the wayside after about a month or two.  I think that as women, we tend to beat ourselves up for all the things we think that we do not do.  I was reading a post the other day from here, and she talked about setting goals in reverse and how instead of listing all of the ways that we failed to accomplish last year’s goals, we should make a list of all of the things that we actually do right during the year.  Well I  thought about that quite a bit and decided that I really liked that idea, but I wanted to take it one step farther.  I made a journal so that I can record the things that I have accomplished or overcome every month and then I can realize all the things that I did do, and not beat myself up for all the things that I did not do.  I would not make a “to do list” of resolutions but rather an “I did list!”  I would then concentrate on the “half full glass rather than the half empty glass”.  I think it will be a great thing to be able to look back at my achievements each month.  Then I decided that if I dated my entries I could look back over several years at a time!

So do you want to make a journal to record all of your goals that you set in reverse!

Start with any notebook.  I used a good old composition journal, but you can use any type of journal or notebook.Cover the front and the back.  I put the book on top of the paper and just traced around it.  I  just went to the black strip with my paper.  Ink the edges if you prefer and then adhere paper to the front.Next cut your tabs for the dividers 1 1/2″ x 3 “.  I used six coordinating  patterns and cut two of each, so that I had twelve tabs, one for each month.I wrapped ribbon around the front of my journal and glued it to the inside cover.  If you want to add ribbon you will need to do this step.Next, cover the inside of your journal.  Again I just put the cover on my paper and traced around it.. You want to leave a very little space on the inside, so that your book will close properly.  Cut out and ink the edges.  Adhere to the inside cover.  Repeat this step for the back cover.

To add your tabs to the pages, fold tabs in half to make a 1 1/2″ x 1 1/2″ square.  Ink edges if desired.  Put one sheet of paper in between the tab and glue it so that about 1/4″ is sticking out beyond the page. The tab is showing  on the front and the back of that page. Space evenly so that you can space 6 tabs down and then 6 more behind that.  I had a 100 page journal, so I spaced the tabs every 8 pages.  That left a few more at the back, but  that does not matter.  (You could add  a title of  ”NOTES”  to the last few pages if you wanted to.)  Then number the tabs from 1-12 for each of the months.
Decorate the front anyway that you would like. I wanted to make this a fun book that I would want to use over and over again, so I decorated it up by adding this flower and ribbons, which are pretty dimensional, but I am going to keep this book out on my desk, so that I will see it often and try to remember the purpose of this book.  If you are going to keep it on a shelf, you will want to keep the front pretty flat.  But just remember that the outside of the book is not what is important, but what you write in the inside!On the inside cover you will want to add this label.  It tells you how you should use this journal in setting your goals backward!Here is a printable for you to print for the inside cover of your journal.  I kept it pretty simple so that it would match with whatever color you use.  I matted this label with a green to match my book.  To print, just right click and go to copy, open your favorite program, like word, and right click again and to to paste.  The original size is 4″ x 6″.

Now I need to go and record that I got my closet completely dejunked and cleaned out and donated clothes to a worthy cause.  I spent time with my husband, and some of my grandchildren, which is time very well spent.  I also exercised 3 times this week!  So instead of beating myself up, I am going to try to look for all the good around me!