Monthly Archives: November 2011

Thanksgiving Table Centerpiece

I had to make some centerpieces for a small dinner last weekend and this is what I came up with.  I thought that they looked festive without too much work!

I found this black fabric with gold glitter in the design, so I thought that I could just use the gourds and pumpkins leftover from Halloween. I used the gold Krylon Glitter Blast spray paint to paint them and then just simply tied ribbons and tulle on them.  For the jars, I filled them up with black beans and put a battery votive candle down in the beans.  Then I tied the jars with a pretty metallic gold ribbon…

And  I think that they turned out pretty cute with out a lot of time or money!  You could also put popcorn kernels, candy, rice, or just about anything in the jars to make your candles.  I think I will have to use this idea again for Christmas, with red and green candies in the jar!

 Do you have any fun, easy ways to decorate your tables?  I would love to hear from you!

A Little R & R

This last weekend we went to the cabin. It overlooks Rockport Reservoir and this is the view from one of the front windows.  It was a little cloudy and all the leaves have fallen off the trees, and I was thinking that it was kind of drab, but when I looked at the pictures I thought that it was really beautiful and it is so relaxing to just sit and look out the windows at all of the beauty below us!  There were actually quite a few boats out on the water this weekend, my husband says that fishing is usually pretty good this time of year.  I thought that the fishermen were pretty crazy, but I can think of a lot of things that I do that are pretty crazy too! :)

Another view.My oldest son and his family came up and joined us this weekend, so we had fun working on puzzles…wrestling…romping…
and playing with toys!But the next morning when we woke up…This was the view out the front window!  How beautiful is that? If I did not have to worry about everyone driving down the mountain, I could just stay there all day and sit in front of the fireplace, but we had to leave early before the big snow storm came in.

I don’t know what it is about being out in nature that is just so relaxing…but it is!  Ahh…

Thanksgiving Placecards

Today I have some cute little name cards for you to print out for Thanksgiving.  All you have to do is print them, cut them out, fold in half, and write names on them.  What could be easier?  It is amazing how such a little thing like this can dress up your Thanksgiving table and make people think that you really went to a lot of work! (No one has to know!)

There are two sheets, 4 on each page, (8 total).  If you need more than that, just print duplicate pages.  To print, just right click on the image, then go to copy. Open your favorite program like word, and right click again and go to paste.  They are in 81/2 x 11 format so you can just print them from your printer!

They would be fun to pair up with a treat or some nuts.  There are all kinds of fun ideas on pinterest, follow my Fall/Autumn link if you need some other ideas!

A couple more  ideas that you could do with these printables: is to use them for a napkin ring. just cut off at the fold and wrap them around your napkins, or just use the top part for a tag to tie on a treat bag, or the top of a jar with goodies in it!  You could also use this just the way it is as a fold-over topper and staple it to the top of a small clear bag.

Oh the possibilities!


Apple Braid

What says fall more than apples!

 I decided to make an Apple Braid for dessert.  It smelled so good cooking and it warmed up the house as well as the soul!

Braided bread looks like it is hard to do, but it is really very easy–so let’s get started.  You will need on loaf of bread dough.  I used frozen Rhodes Bread, but you can use your own homemade recipe, or you can even buy scone dough at a lot of your bakeries.

Roll the dough out a little bit , then place on a baking sheet that has been sprayed with cooking spray. With your fingers, spread the dough out into a rectangle on the baking sheet.  You kind of have to work with the dough to get it to stretch out.

Using a 4″ putty knife, cut the dough into 1 inch slits like this.

You read that right!  I use a regular putty knife (a new one, not one I used to scrap paint with!)  I learned this trick in a bread class that I took a few years ago!  Just just go to the hardware store and buy a plastic 4″ putty knife to keep in your kitchen drawer!

(Sorry about this picture, I was in a hurry and only took one pic, and this was it!)

 For the filling, I used this canned apple pie filling.  You could make your own filling, just make sure that you cook that apples part way before filling the braid.  You could use any kind of fruit, that you would use for a pie!  Another version that is good is a cinnamon crumb with nuts added to it!

 Spread the filling down the center of the braid.  Then start braiding.  Fold the first strip over the top of the filling on a diagonal to the second strip. Go back and forth like this all the way down.  Tuck the ends in to secure.

 This is what it will look like.  Cover the pan and let it raise for about 20-25 mins.

 Bake at 375 degrees F  for 25-35 minutes, until golden brown.  I learned at that same bread class that you can tell when bread is done by looking at the bottom.  If it is a golden brown on the bottom, the bread is done.

Let the braid cool for 15-20 minutes and then drizzle with a glaze of: 1 cup powdered sugar, 1/4 c. softened butter, 1/2 tsp almond extract, mix this together then add 1-2 TBLS of milk, a little at a time,  just until thin enough to drizzle.

Looks delish!

What kind of fall desserts are your favorite?  I hope that you will try this one because you just might want to add it to your list!

My cooking class with the Food Nanny/ Best Day Ever!

This post is courtesy of my cute DIL!  She had the opportunity to go to a cooking class with the Food Nanny.  Boy, was I jealous!  But at least she shared her experience with us and even better, she made the rolls from a recipe in the cookbook from the Food Nanny.  She got the ultimate compliment on them at our Sunday family dinner, my oldest son told her that they reminded him of Grandma Stevens rolls!  My mom was the best bread/roll maker around, and so that was quite a compliment.  I told my DIL that we all wanted a girls night out with a demo on how to make the rolls and she said that she would, so I think that we will have to hold her to that one! :)
This is her post:
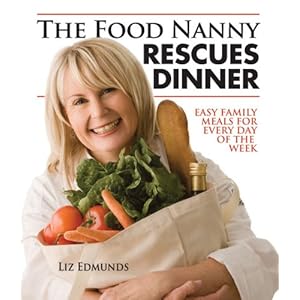
So you may or may not know that I am a HUGE fan of the Food Nanny on BYU-TV. I first read about her on a blog last spring and then I saw the book in Costco (where else?) and had to pick it up. I was instantly hooked. She is a huge advocate of family mealtime, which is something that I had been struggling with for a while. My husband works most evenings and is only home for dinner once or twice a week. This leaves me with four small kids and a great excuse to scrounge up some lame food most nights and not make anything special. I had a nagging feeling that I should be doing more, because I do love to cook, but was I being wasteful by making nice food for little kids who didn’t appreciate it? And should I be eating well/gaining weight if I didn’t have to? Cereal seemed to be the answer most of the time. I’d cook up something that sounded good once in a while and overindulge, then feel guilty and swear to eat cereal for a few days. My kids seemed to be happy with whatever I put in front of them, so I didn’t have the motivation to make any changes. Then I found the Food Nanny, Liz Edmunds. She has raised seven children and attributes her success as a mother to consistent family meal times. What I can most relate to about her is that her husband was gone most of the time (he was a pilot), and she still brought her family together every single night for a home-cooked meal at the dinner table. She says she just needed something for her and her family to look forward to every single day. It was like a light bulb went off in my head after learning that. (What, her husband was gone all the time, too, and she STILL did all this? Well, why can’t I?) I also love her philosophy about eating real and not dieting. She says you should eat what your body craves, but only until you are satisfied. Then you just push your plate back. And she obviously practices what she preaches because she is tiny! (So you mean I can make good food for my family AND eat it? And not spend my life counting calories? Sign me up!) Her cookbook is nothing short of amazing. Her recipes are simple but gourmet at the same time. Everything I have tried has been great. Everything. I absolutely love her philosophy about Family Dinner. “It’s the most important time of the day!” she says repeatedly on her show. You can watch every episode on byutv.org and I highly, highly recommend it. I have tried so many new recipes and methods of cooking that I never thought I would even attempt. Most importantly, my family has come to expect Family Dinner every night (or most nights!) whether Dad is home or not. It’s not always fantastically planned out with the table set and wonderful food, but the kids don’t seem to care. I just do my best that day, whatever it is. My kids love sitting at the dinner table together and discussing their days. We each tell the best part and worst part of our day and it leads to some pretty interesting conversations! Abby can’t seem to distinguish the present day from the past, so we all have some great laughs over what she thinks happened that day, which probably happened several weeks ago, if at all. The other night Jason was with us and he was telling me all about what happened at work that day when I noticed Dallin was pouting. I asked him what was wrong and he said, “Why don’t we just call this Mom and Dad Dinner instead of Family Dinner, since you two are the only ones talking?” I had to laugh. I asked him what he wanted to talk about and he was just busting to tell everyone about how his CapriSun had sprung a leak in his lunchbox that day and ruined his lunch. I love that he was saving something that was important to him to share with the family at dinner.
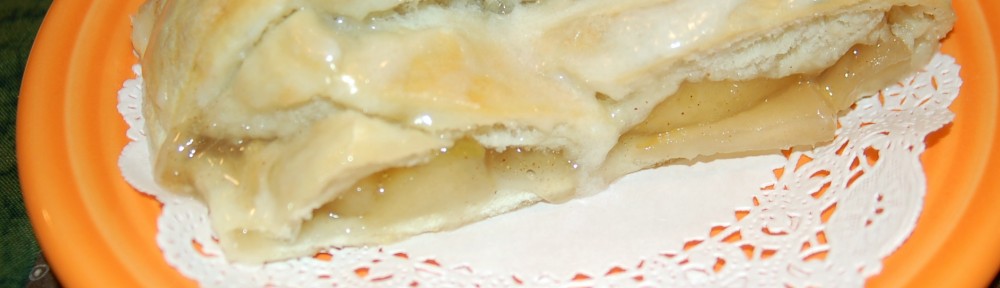
You can imagine my excitement a few weeks ago when I saw on the Food Nanny’s Facebook page that she was going to be hosting a cooking class AT HER HOME for a very reasonable price, and it would include one of her cookbooks (Happy Birthday, Mom!)!! I immediately signed up and trusted that it would work out, and it did. I told Jason that it was my present for him going to Texas to hunt whitetails this week, which he had to agree with. It was SUCH a fun day. The thing I love most about Liz (I can call her Liz now, we are kind of tight like that) is her energy. She is a TINY little thing, but she is so excited about life and so full of passion about what she teaches. I always thought she was adorable, but wondered if maybe she was just a rich lady that loved to cook and had a lot of breaks in life. Not so. She is a humble, kind and hard-working lady who has made the best out of everything she has had to deal with in life. Her house is amazing, but it is not fancy. Just simple and beautiful and functional. Mostly, it is welcoming and comfortable. Very down to earth. I loved it. There were about fifteen people in the class and she made all of us feel so at home. I wanted to just stay afterward and hang out and help her do the dishes, but I had a babysitter at home and an hour drive ahead of me so I was sad to have to leave. The class was GREAT. She made so much food and ALL of it was fantastic. Apple Pie, Apple Crisp, French Baquettes, Bruschetta, Arugula Pizza, Chicken Marsala With Mushrooms, Spaghetti Carbonara… am I missing anything? She impressed me so much with her passion about cooking for her family. It’s not like she just had her kids grow up and leave the house and got bored so she decided to write a book. She really lives it. She has lived this philosophy for 40 years and made a rich, wonderful life in the process. That is what I want! I want my kids to know what HOME feels like, and I think family meals around the dinner table on a consistent basis are the foundation for what I have been looking for. Even if it’s just the kids and me most of the time. When Jason is home it is just all the more special.

Baquettes fresh out of the oven! So easy, and how cute is that little pan?
Liz made a special bruschetta that will be featured in her next cookbook (can’t wait!!). It was amazing. I am still thinking about it.

Here she is adding the chicken to the Chicken Marsala. Wow, so good!
Here are just a few of my favorite recipes from the book, for your FYI (ha ha, I love it when people say “For your FYI” because it doesn’t even make any sense!):
p. 34 Roast Chicken with Gravy – I make this for my VERY special friends when they have babies. It is probably my favorite meal to make in the world. I used to have a fear of raw chicken, and what the heck do you do with a whole chicken anyway, but Liz helps a lady who HATES raw meat make this on one of the shows (It’s called “Chicken Chicken”) and suggests using plastic gloves when handling raw meat! I picked up a box of surgical gloves and my life hasn’t been the same since. I feel so liberated!
p. 78 Chicken Marsala With Mushrooms – I was so excited when she made this at the cooking class! It is the first thing I have ever made with cooking wine and it is SO fun and delicious. I love making it.
p. 182 Slow-Cooked Chicken Noodle Soup – Easiest and best chicken soup I have ever made! Sometimes I use potatoes instead of noodles. I also use boneless, skinless chicken thighs and it is fantastic.
p. 149 Grilled Salmon – I had never made salmon on the grill before, and this is now one of my go-to meals because it is so simple and my kids love it! Plus, I’m so excited to be feeding them fish! I feel like Mom of the Year.
p. 234 Liz’s Crescent Dinner Rolls – Hands down, my favorite recipe. These are better than Lion House Rolls, in my opinion, and so easy! I make them way too much. I’m making them today, in fact. The best part of this recipe is that it makes one big pan of rolls that only needs 12 minutes in the oven, instead of three pans for 20 minutes each. Who has that kind of time? I can whip up the dough in ten minutes in the afternoon and pop them in the oven a few minutes before dinner, and wow. According to Luke, it’s heaven.
There are so many more recipes that I love, and my secret goal is to try every recipe in the book. Probably won’t really happen, but at least we will be eating good in the mean time!

Give Thanks Banner

Here is the  cute “Give Thanks” banner that I did as the guest post last week.  It is a free printable, that you just print out, laminate if you wish and tie together with cute ribbon.  This would be cute hanging above your Thanksgiving table, a doorway, or on your fireplace.  (Look how cute it is with my Thanksgiving subway art board, that I made at Landee’s craft night!)

Here are the printables.

To print, just right click and go to copy.  Then open your favorite program, like Word,  right click again and go to paste.  They are in an 81/2 x 11 format, so you can just print them.  You can also email them to your favorite printer.  In my area (Utah) you can send them to Alphagraphics and they will print them for about 55 cents each and that is on card stock.  So that is pretty inexpensive!

I used an oval paper punch to punch out the holes, but you could just use a regular punch, or cut them out with your scissors.  The ribbons cover up the holes, so you do not see them anyway.

Happy Thanksgiving!


Fall Bunting

I promised everyone that I would have an idea to go with the fall banner that I posted here.

This is a fun, super easy fabric fall bunting.  They are quite the thing right now and I can see why so many people love them.  They are fast, easy, inexpensive and they add so much to your decor or to any party!  You can make a bunting out of fabric, paper, wood, metal, or just about any medium that you can think of!  Here is my bunting on my fireplace, but you coulld hang it above your Thanksgiving table, drape it over a picture or a chalkboard, or in a window.  So many possibilities!

So let’s get started making a fabric bunting!  I made this bunting double sided so that if I hang it over my island in the kitchen, it looks great from both sides.

First make a pattern.  I used a 7 inch triangle.  Pin to your fabric with wrong sides together. Right sides out obviously:)This is  a great way to use up all of your fabric scraps, and you can make your triangles as big or as little as you want them to be.  I did and odd number of triangles (11) because to me that just looked better.

 Cut around your pattern with pinking shears if you have them, if not regular scissors or your trimmer blade will do. Next, sew 1/4 inch seam all the way around through both layers of fabric.You will need one package of bias tape, this is the extra wide width and I liked it because it was easier to work with.Find the middle of the bias tape and the middle of one of your triangles.  Pin the triangle inside the tape.  Make sure you have the shorter width of the fold on the front where you will be sewing so that you make sure to catch it in the back when you sew the seam.Pin all of the triangles in the bias tape according to how you want them placed.Sew your seam close to the edge of the bias tape edge making sure you catch the triangle and the back of the bias tape. This really is simple if you have pinned it all ahead of time.  Make sure the triangle edges are touching each other, you can overlap them a bit if you want to, but I just made sure that they were butted right up to each other.See how simple and easy that was, and look how much they can add to you fall decor!Here is a picture of my bunting with my fall banner that I posted earlier.  I think that they look so cute together!  I just think that the possibilites are endless with these buntings!You could totally do this bunting with no sewing.  Make the triangles only one layer and glue, staple or tape to a fun ribbon, ric rac or cording!  Oh the possibilities!

What are some of the fun ways that you decorate for fall?  I would love to here from you!


Guest Post

Hi everyone, I am so excited because today I am doing my first guest post!

  Please join me over at Landee See Landee Do.   Landee has a great blog with tons of cute ideas.

She is a fun girl and is so kind.   I met her at her Utah Craft Night and she gave me some great ideas and helps for this blog.

For her post I have made  a really cute fall printable banner for Thanksgiving, so go take a look at it at Landee See Landee Do, and then check back here in a few days for a fun idea to go along with the banner!

Mom’s Chili

This recipe is one of those that you just can’t hurry…but is worth the wait!

Is there anything better than a good hearty bowl of chili on a cold, and dreary day?

Mom’s Chili Beans

1 1/2 -2 cups red kidney beans-rinse well, then soak in a big kettle, (covering beans with hot water) for a couple of hours, then simmer over low heat until done (2-3 hours). You may need to add more water, so the beans do not boil dry.

Brown 1 lb hamburger,

add 1 onion diced and

1 green pepper-chopped

Add to beans along with:

1 large can diced tomatoes, or 3-4 cups tomato juice (I usually do a combination of juice a 1 small can tomatoes)

1 1/2 tsp salt

1/8 tsp paprika

1/8 tsp cheyenne pepper

1 bay leaf

1-2 tsp chili powder (depending on how spicy you want it!)

Simmer beans and rest of ingredients all together for 1/2 hour.  Remove bay leaf before serving. To serve you can top with shredded cheese, sour cream, corn chips, bread cubes or croutons.  Serve with a big slice of bread or your favorite crackers!

Great comfort food!


November Visiting Teaching Conference Bookmark

This month for visiting teaching you will pick a talk from the conference Ensign, so for the handout, I decided to do a bookmark.

You can use it two ways.  It has a paper clip at the top so you can clip it to the page you want to save, or if you are cross referencing or studying two different talks, you can take the paper clip off and use it on another page, like this…

I cut a slit in the top of the bookmark to insert the paper clip.  Tie a couple of ribbons on the paper clip to make it a little cuter :) I think that ribbon makes everything cuter!  Some day I will show you my ribbon stash!

I had Alphagraphics print my bookmarks on a heavy, glossy cardstock and it cost me 69 cents!  I have put 4 book marks on one 81/2 x 11 sheet, so there should be enough for you to have one too!

To print, just right click and go to copy, then open your favorite program, like Word, then right click again and go to paste.  Or you can send it to your favorite copy center like I did.

 Here is the free printable for you to use:

Happy Thanksgiving to you!

We hope your family like ours, continues to have more to be thankful for each year!