
I decided today that I would do a roundup of 15 Fall and Halloween crafts, decorations, recipes, and printables from previous posts. To view the post, for directions or recipes, just click on the link below each picture. Continue reading

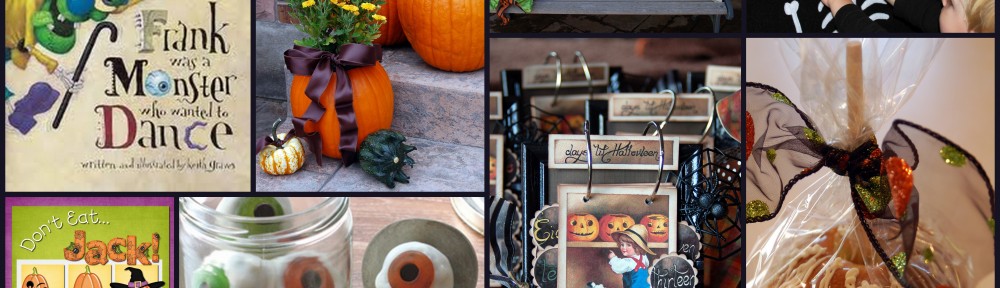
I decided today that I would do a roundup of 15 Fall and Halloween crafts, decorations, recipes, and printables from previous posts. To view the post, for directions or recipes, just click on the link below each picture. Continue reading
Here is another recipe from our 4th of July party. It really does live up to it’s name as in EASY! It is a very pretty pie and makes a great presentation! This would be great for any summer gathering!

I was contacted by a company called “Lucky Leaf” and asked if I would like a free sample of their products and then in turn would I write a post about it. I was actually quite excited about it when I found out that it involved food! So a few days later I received a fun package in the mail and I was excited to try out some of their great recipes!
The first recipe that I tried out was the frozen pie pops, who would of thought to make a Popsicle with canned pie filling? Not me, but I tried this recipe and they were delicious and so full of flavor. I love the cute pop mold that they sent, the handle on the top looks like a tongue sticking out ready to lick the Popsicle! As you can see a couple of my grand kids did the kid-taste test and it looks like they passed, they loved them and I loved how quick and easy they were to make.

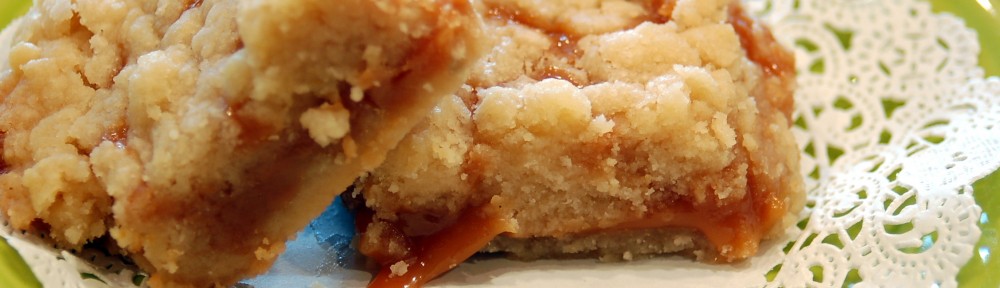

Salted Caramel Butter Bars
This recipe is one of those that you just can’t hurry…but is worth the wait!
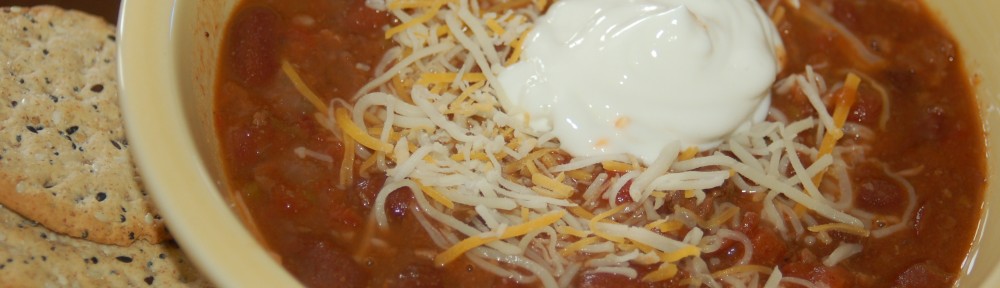
Is there anything better than a good hearty bowl of chili on a cold, and dreary day?

Mom’s Chili Beans
1 1/2 -2 cups red kidney beans-rinse well, then soak in a big kettle, (covering beans with hot water) for a couple of hours, then simmer over low heat until done (2-3 hours). You may need to add more water, so the beans do not boil dry.
Brown 1 lb hamburger,
add 1 onion diced and
1 green pepper-chopped
Add to beans along with:
1 large can diced tomatoes, or 3-4 cups tomato juice (I usually do a combination of juice a 1 small can tomatoes)
1 1/2 tsp salt
1/8 tsp paprika
1/8 tsp cheyenne pepper
1 bay leaf
1-2 tsp chili powder (depending on how spicy you want it!)
Simmer beans and rest of ingredients all together for 1/2 hour. Remove bay leaf before serving. To serve you can top with shredded cheese, sour cream, corn chips, bread cubes or croutons. Serve with a big slice of bread or your favorite crackers!
Great comfort food!
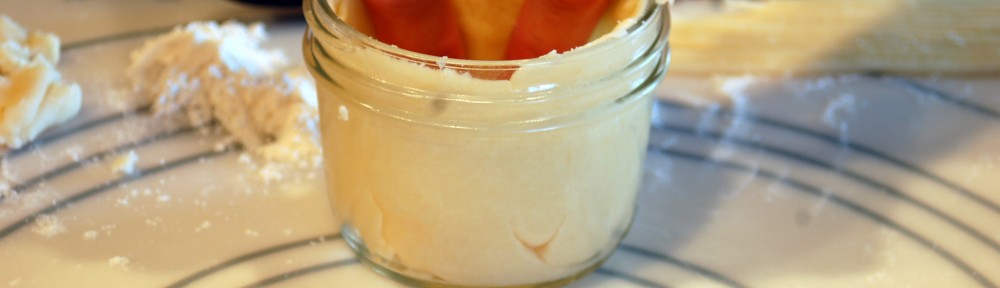
My daughter-in-law taught a class on how to make these darling pies! You can see a great tutorial here from Our Best Bites. She made little mini apple pies in glass jars. First you prepare the apples-peel and slice them, about 6 cups. Add 1/2 cup sugar, 1/2 cup brown sugar, 2 tablespoons flour, 1/2 teaspoon cinnamon, and 1/4 teaspoon nutmeg, 1 tablespoon lemon juice. Mix well and set aside.
 Make No Fail Pie Crust and roll out quite thin. Using the rim of the jar, cut a round circle for the top of the pie. Then roll out another circle large enough to put down inside the bottle. Or you can just take pieces and press them into the jar. Make sure that you push the dough down into the bottom of the jar, and that you press it all the way to the top. Add prepared fruit, approximately 1/2 cup per jar. These are 1/2 pint wide mouth jars.
 Add the dough circle to the top. You will need to vent them by cutting slits in them or using a small cookie cutter, like the leaf to cut a hole in the top. Gently press down the top, so the edges of the circle are completely inside the jar. (The braided top should have been pressed down to be completely inside the jar, so learn from us!) Using a fork press the dough from the top to seal with the dough in the jar. Here are several versions of how you can make the tops…Lattice, braided edge, or leaf cutout. You could also use a crumb topping.
 Sprinkle the tops with a little bit of sugar. You could also brush the tops with a little bit of butter before sprinkling the sugar on. Doesn’t this look Heavenly?!
 Place the jars on a baking sheet. Bake them at 375 degrees F. for 45-55 minutes or until tops are golden brown.
 After they cool down you can wipe the edges off and add these cute toppers to your jars! What a fun gift idea! The holidays are coming up soon and these would be fun neighbor gifts, or for your friends with a carton of icecream and fun scoop…you get the idea.
 She did a great job and look how yummy they are!
 Here is the printable for the top of the jars. Just right click and go to copy, then open your favorite program, like word, and right click and paste. These are the right size for a wide mouth lid.
 Here are some cute tags to tie on with the ribbon.

You could buy all ready made pie crust and canned pie filling if you want a faster version of making these. I am thinking it would be way fun to do Pumpkin pies for Thanksgiving!
This is a recipe for No Fail Pie Crust, that I have in an old church cookbook. I cannot remember how long ago, but at least 20 years ago! And I know that it has stood the test of time! I have never had this recipe fail me! Just make sure that you do not over mix the dough.
Happy Pie Making!
No Fail Pie Crust Recipe
4 cups flour1 3/4 cup shortening
1 Tbsp. sugar
2 tsp. salt
1 egg
1 Tbsp. vinegar
1/2 cup cold water
Mix flour, salt and sugar together. Beat egg, vinegar and water until thouroughly blended. Cut shortening into dry ingredients until it is the size of peas. Sprinkle egg mixture over it, a tablespoon at a time, tossing and stirring lightly with a fork. Mix until dough is just moist enough to hold together. Do not overmix or it will make a tough dough.
Form ball. Let stand for 15 minutes. Makes 4 shells or 2 double-crust pies. Bake shells 8-10 mins at 450 degrees F.
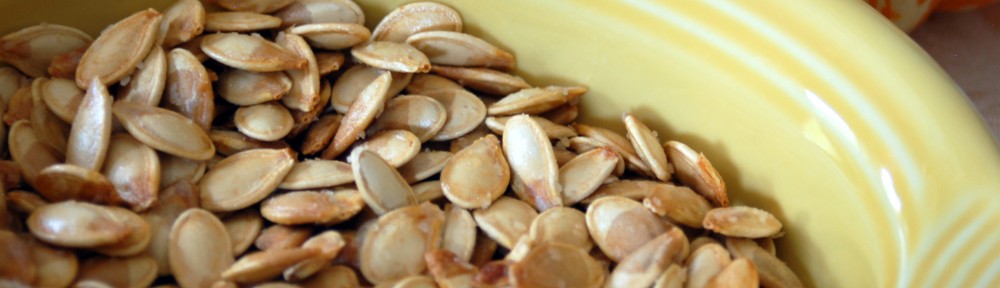
When I made the “mumkin” the other day, I took the seeds out and decided to roast them. I found a recipe on allrecipes and tweaked it a bit. But boy are they yummy. I have never made these before and I think that I may have just discovered a new tradition for our fall treats from now on!
 Here is my version of the recipe: Roasted Pumpkin Seeds
1 cup raw whole pumpkin seeds
1 tablespoon butter-melted
Kosher salt
Preheat oven to 300 degrees F
Clean the pulp off the pumpkin seeds. Rinse well and pat dry. Toss seeds in a bowl with the melted butter. Spread the seeds in a single layer on a baking sheet, sprinkle witih kosher salt and bake for about 45 minutes or until golden brown. stir occasionally.
Let cool and enjoy. I think that these would also be good with garlic salt, seasoned salt or any other seasoning that you love!

I ‘m “nutty” about these Roasted Pumpkin Seeds!

It is a cold, rainy, dreary day outside today. Perfect for staying indoors with a big mug of hot chocolate with the fireplace going and a good book to read, wrapped up in your favorite quilt! At least until you have to get on with real life! But you could at least make a big mug of hot chocolate!
A few years ago my friend, Leslie, gave me this recipe for French Cocoa. I really was not a great fan of hot chocolate…but I guess that I am now!
 To make this French Cocoa you will put the unsweetened chocolate squares, sugar and water into a pan. (I am only making 1/2 of the recipe, because it is too big for my empty nester family.)
  Bring to a boil and let it boil for 3 minutes, stirring occasionally. Then let it cool to room temperature.
 Whip your cream until it is very stiff.
 Fold the cooled chocolate into the cream.
 This is heaven, folks! At this point you can just refrigerate until you want to make French Cocoa. (Try not to eat the whole bowl before you make the cocoa. I may or may not have had a few tastes!)
 Or you can take a large icecream scoop…
 And scoop onto a cookie sheet. I lined mine with parchment paper so they would come right off after freezing them. Flash freeze for about 2 hours, then put into a freezer container. (Half of the recipe makes about 12 servings)
 To make your cocoa, heat milk in a mug until very warm. Add one scoop of the chocolate mixture and watch the foam start to form!
This truly is a great comfort drink and warms you all the way to your toes! You need to try this recipe. It is Heaven!
 Here is the printable recipe. To print-right click on the image, go to copy, then open your favorite program, like word. Right click again and go to paste.
It is a 4 x 6 format so it will fit in your recipe box!
I went out last Sat. night and noticed that my peaches were ready to pick! The reason I knew they were ready was because the birds had started eating them! I was bound and determined not to let the birds win, so my husband and I went out and picked them all. This tree is only 3 years old and it was loaded this year. I should have thinned them out a little more because they were not really big, but that is ok, because they have a fantastic flavor! I bottled peaches on Monday and I love to see all the bottles lined up on my cupboard before I put them away in the pantry. I think that they look so pretty.
 Then I had to make this yummy fresh peach dessert.
I’m in Heaven! Here is the recipe, if you have any peaches around, you should seriously make this dessert!
Tomorrow I am going to flash freeze the rest of the peaches on a cookie sheet so that I can make smoothies with them! Yum!
I had a little Girls Night Out with my cute girls. We made a fun Halloween craft that I will post next week. But while everyone was here, we had to eat of course! We had chips and homemade salsa which is always a favorite also fruit and carmel dip and yummy pumpkin cupcakes with carmel frosting. I can feel fall starting to come in the air, and carmel and apples and pumpkin are the smells and tastes that come with it!
This recipe is from my sister and the secret ingredient is the green onions! They make it taste sooo good! If you are looking for a way to use up all those tomatoes and peppers from your garden you should really give this recipe a try!
